A detailed guide to using Microsoft Word. Ms Office Excel training courses for "dummies" - learning Excel step by step from scratch How to work in the Office program
The Microsoft Office application suite is useful software with an adequate price. But why buy a license when you can use office programs for free? No copyright infringement: Microsoft developers themselves provide several ways to use the product for free.
office online
The easiest way to use the Office apps for free is to open the online version with a Microsoft account. You can find a list of programs. If you don't have a Microsoft account, you can create one quickly and for free.
Online versions of the programs are convenient in that they can be used from any device with Internet access. However, they cannot be called a full replacement for applications: cloud storage options are limited without a paid subscription, and some features are not available. But for simple tasks like writing a letter, a term paper, or creating a spreadsheet in Excel, they can be used.
If you have Yandex mail, then you can access individual Office Online products without a Microsoft account. For this it is enough:
- Go to Yandex, log in and open "Disk".
- Click the "Create" button and select "Text File" or "Table".

The text file is created in Word Online, the table is created in the familiar Excel interface. The document is saved on Yandex.Disk in the appropriate formats - *.docx and *.xlsx.
office mobile
The Office Suite is not pre-installed on computers, but some mobile devices come with mobile versions of the Office programs. The same mobile applications can be downloaded from the Microsoft store and installed on a PC or laptop.
- Launch the Microsoft App Store.
- Type the name of the office program with the addition of the word "Mobile" (for example, Word Mobile).
- Click "Get" and wait for the installation to complete.

However, mobile versions also work with limitations. You can edit documents on large-screen computers, laptops, and tablets only after purchasing a paid subscription to Office 365. You can create documents for free only on phones and small tablets, subject to authorization with a Microsoft account. Without authorization, programs open documents in Read-Only mode.
Free Office for Education
Staff, faculty, and students can use the Office apps for free as long as their school is registered with the Office 365 system. Registration is done by an authorized employee, and students and faculty must provide a valid email address on the school system to access the products.
Trial period or participation in testing
If you need office applications right now with maximum functionality, but there is no way to purchase them, install a trial version for 30 days. Available in test mode:
- Full versions of Office 2016 programs.
- Installation on 5 computers.
- Mobile versions for 5 phones and 5 tablets.
- 1 TB of OneDrive storage with 5 user access.
After a month, the software will stop working, so you will have to decide whether to buy a subscription or use other legal ways to use Office applications for free.

By the way, when Microsoft is preparing to release a new product, public testing is launched. You can also take part in it for free, you just need to apply.
Alternative software
Microsoft Office is not the only application suite that can be used to create and edit documents. Free options include:
- libreoffice.
- openoffice.
- WPS office.
These packages contain a similar set of programs and are distributed free of charge. There are also free alternative web solutions, such as the Google Docs app.
We study the most popular text editor Microsoft Word. In this tutorial, you'll learn how to create a new document, enter, edit, and format text, create lists, apply styles, and more.
With this article, we open a whole series of training materials with which you will learn how to create high-quality text documents in the most popular application in this area - Microsoft Word (Word). The presentation here will be in a rather primitive language, which may at first scare off readers who are already partially familiar with this editor. But, believe me, you will most likely find useful information in this cycle.
Microsoft Word is a text editor (processor) used to create professional-looking documents. The name Word was not chosen by chance, because in translation from English it means "Word".
Due to the fact that Word combines the most modern text formatting tools, with it you can easily create documents of any complexity and organize them. In addition, with powerful editing and editing tools, this application provides a convenient environment for multiple users to collaborate on a single document.
In the first part of the Word tutorial series, you will learn how to create a new document, enter and edit text, and get acquainted with some basic types of its formatting. Here we will begin our acquaintance with the newfangled ribbon interface of the editor. We will also look at creating bulleted and unlabeled lists, changing document margins, and much more.
PROGRAM WINDOW
When you open Word in the program window, its two main parts are displayed: the ribbon located on top (highlighted in red in the figure below) and an empty document that occupies almost the entire program window.
The ribbon includes a set of buttons and commands that perform various actions on a document and its contents (for example, resizing text or printing it). The document window itself looks like an ordinary white sheet of paper and is designed to enter all kinds of test information.
Also above the ribbon on the left is the quick launch menu, in the middle is the name of the document, and in the upper right corner are the buttons for minimizing, resizing and closing the program window.
In the opened document in the upper left corner of the page you will see the cursor, that is, a small blinking vertical bar. This feature indicates that, starting from this place, the characters you entered will appear.
ENTERING AND EDITING TEXT
After opening the program, just start typing, and the letters, words, and sentences you enter will start showing up on the document page. In order to start typing on the same page, but one line below, you must press the Enter key. The number of hits on Enter will correspond to the number of skipped lines. As you enter text, the cursor gradually moves to the right. When you reach the end of the line, just keep typing letters. The characters and the insertion point will automatically wrap to the next line.
If you need to start a new paragraph, press the Enter key to do so. As a result, the cursor will automatically appear at the beginning of a new line. If you want to make the spacing between paragraphs a little more, press the Enter key again before you start typing a new paragraph.
If you need to correct a mistake in the typed text, just place the cursor to the right of the unnecessary letter and press the Backspace key. The cursor will delete the character to the left of it. If you want to erase the entire word, press the indicated key as many times as the word disappears. There is another option for deleting an error: put the cursor at the beginning of the word, that is, to the left of it and press the required number of times the Del key.
Practice your typing and editing skills by typing a few arbitrary paragraphs, or by typing our suggestion.
.jpg)
ERROR CORRECTION
As you type, Word warns you of grammatical or spelling errors by highlighting them with a wavy green or red line. A green underline indicates that the grammar needs to be checked, and a red underline indicates possible spelling errors or that the word (for example, a proper name or place names) is not recognized, that is, it is not in the dictionary of the Word editor.
What to do with such highlights? To do this, move the mouse cursor over the underlined word and press its right button. As a result, a small window will appear with suggested fixes. Select the required word and click on it with the left mouse button. The word will be replaced and the underscore removed. If the word is not recognized, Word will not offer any suggestions. Note that if such underlining is not corrected, it will not appear on the printed pages of the document.
Similar actions can be done with green underlines. But keep in mind that Word is good at recognizing spelling errors, most of which are quite easy to fix, and finding grammatical and word usage errors on your own is much more difficult. If you think you're right and Word suggests the wrong options, just skip the correction by selecting the appropriate item from the right-click menu and the underline will be removed.
If you don't feel comfortable focusing on every underscore, you can ignore them as you type, and check spelling and grammar for the entire document when you're done typing. To do this, open the tab Peer review at the top of the ribbon and select Spelling in Group Spelling.
If you still have questions about working with the ribbon, come back to this point later, as the description of working with it will go a little lower.
SELECTING TEXT FRAGMENTS
In order to perform any actions with the text in the document, it must be selected, and then the desired command must be applied to the selected area. To select a whole word or a preposition, it is enough to double-click on it, after which the selected area will be highlighted in blue.
There are two ways to select an arbitrary piece of text. In the first case, place the blinking cursor at the beginning of the fragment you want to highlight. Then press the Shift key and, without releasing it, click at the end of the desired fragment. After that, the required text will be highlighted with a blue background to show that it is selected. Click anywhere in the document to deselect.
In the second case, also set the blinking cursor to the beginning of the fragment, but this time hold down the left mouse button and move its pointer to the end of the desired fragment. After achieving the desired result, the button must be released.
If you need to select several fragments in different parts of the text, use the Ctrl key. Select the first section of text in any way, then press Ctrl and, without releasing it, select the next section, after which the key can be released. If you need to select another fragment, press the Ctrl key again and continue.
TEXT FORMATTING
To draw attention to important information, for example, you can make text bold, italic, or underlined. But these are trifles. You can change its size, style, color, background and apply animation elements to it. And even this is not the whole list of opportunities that Word provides to users when working with text.
Now it's time to remember the ribbon (ribbon interface), which was discussed at the very beginning of the article, and find out how you can use it.
At the top of the working window there are several tabs. Each of them contains a specific set of actions. We need to select the second tab - home(If it is not selected, you must click on it with the left mouse button).
Each tab contains several groups with commands that combine several elements. On the tab home find a group Font(the names of the groups are in the bottom line of the tape). This group contains several commands and buttons that allow you to make various changes to the text.
In our case, select an arbitrary section of text or a whole word, and then click on the corresponding buttons in the above group to change its style.
.png)
As can be seen from the figure, after pressing the button Bold, the selected text has changed its style. And now let's make it even more slanted and underlined by clicking on the buttons Italics And underlined.
In this case, the underline can be either regular solid or wavy, dotted, double, etc. Use the triangle button on the right to see the full list of options.
.png)
From our example, you can see that you can apply several types of formatting to a single selection.
As you may have noticed, the group Font contains quite a lot of different useful buttons that make it possible to change the type and color of the font, its size, cross out the font or convert it to superscripts and subscripts, add animation or background. Select a piece of text and try to apply all these formatting options to it yourself by clicking on the appropriate buttons.
STYLES
The method of making changes discussed in the previous section is convenient only if you need to change the format of just a few characters, words, or sentences. To apply several types of formatting to the entire document at once, styles.
Different kinds of styles are available on the tab home in Group Styles. It is enough to select any style to automatically change the font, text size, attributes and paragraph formatting. For example, you can change the font style, make the text larger, and add bold formatting at the same time.
.png)
As you can see from the figure, after choosing a style called Heading 1, our first paragraph has been converted into a heading (the font size has increased, its color and thickness have changed).
To experiment, on the tab home in Group Styles Hover your mouse over the different styles one by one. Thus, you can see the changes that will happen to the document after you want to apply any option. To finally apply the selected style, just click on it with the left mouse button. To view other styles, you can open the collection by clicking the button in the lower right corner of the block with an arrow Other.
CREATING LISTS
If you need to create a list in a document, this can also be done on the tab home in Group Paragraph(which is located to the right of the group Font).
Let's practice. First of all, separate the text that will be converted into a list into different paragraphs using the Enter key. At the same time, it can be both individual words and whole sentences.
In our example, we decided to list the last paragraph.
.png)
Now select the text you want to convert to a list. In the Paragraph group, click the button Markers. The text will be converted to a bulleted list. Without deselecting the list, press the button Numbering to create a numbered list.
.png)
.png)
PAGE FIELDS
The margins of a page are the empty space around the edges of the page. The default margins for the top, bottom, left, and right of the page are 2 cm, 2 cm, 3 cm, and 1.5 cm, respectively. This is the most common margin width and is often used for most documents. But if you need fields of a different size, you need to know how to change them. Margins of other sizes may be useful, for example, when writing short letters, recipes, invitations, or poems.
The ribbon is also used to resize fields. Only this time use tab Page layout. You must first click it to select it, and then in the group Page settings select item fields. You will see images (icons) of the fields and their sizes.
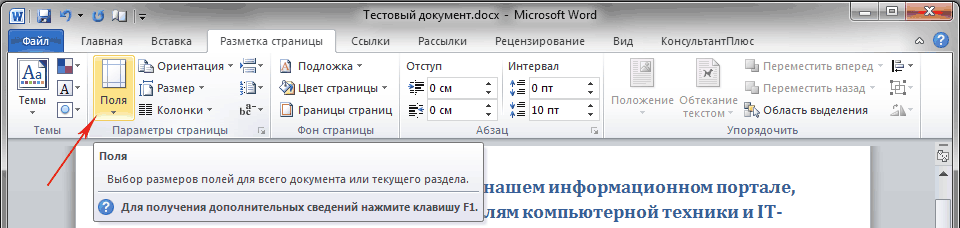
The first value of the list is a field Normal which is currently active. To create narrower margins, you must click the button narrow. If you want to make the left and right margins much wider, click wide. When choosing a field type, they will automatically be applied to the entire document.

When fields are selected, the background color of their icons will change. By pressing the button again fields, thanks to this change in background color, you can determine what size margins are set.
WINDOWBACKSTAGE
In order not to lose the changes made in the work, they need to be saved, and the sooner this is done, the better. To do this, open the very first tab on the ribbon. File. A large window will appear called Backstage, in which you can perform various operations, for example, save, open, print documents, and so on.

In the left pane of the window that appears, select Save. A new smaller window will appear. In this window, you need to specify where on the computer you want to save the document, as well as what name it will have. After you save a document, keep working by saving it periodically. It is also very convenient to save a document at any time by pressing the Ctrl + S key combination.
If the document is already ready to be printed, open the tab again File. In the left pane of the menu that opens, select the command Seal. A large window will appear in which you need to click on the line Seal. Of course, at the same time, a printing device must be connected to the computer - a printer or an MFP. As in many other cases, you can print a document using hot keys - in this case, this is the key combination Ctrl + P.
After the work on the text document is completed and the document is saved, close the file. To do this, open the tab File and in the left area click close.
To find a document after you have closed it, browse the list Latest Documents. Click a document in the list and it will open.
To complete work in Word in the tab File choose a team Exit at the very bottom of the menu or simply click on the cross in the upper right corner of the program window.
CONCLUSION
On this, let me finish the first part of the training materials on the most popular text editor Microsoft Word.
To consolidate the acquired skills, be sure to practice your knowledge by typing a few short texts yourself and applying various formatting elements to them.
In the next part, we'll learn how to cut and paste chunks of text, change line spacing, justify, use formatting marks, and more.
Read also:
Microsoft Office Word is a software tool for writing and processing text. This program is very common in everyday office work. Often, employees who have to work with text require minimal Office skills. There is nothing difficult in printing a text, but certain knowledge is needed to process it and correctly format it.
Basics of working in Microsoft Word
With the help of Word, you can create texts of various types: abstracts, term papers, documents, and so on. It is possible to design text by changing the appearance, adding pictures, tables and other necessary elements.
Typing text into a document
By opening the program from the desktop or menu "Start", we will be greeted by a blank white sheet of A4 paper. The sheet format can be changed to any other standard, more on that later.

You can scroll through the pages using a special slider to the right of the A4 sheet, or with the wheel of a computer mouse.
To start typing text, using the left mouse button, position the cursor at the beginning of the intended text at the top of the page.
If you accidentally did something wrong or deleted a piece of text, you can return the action back. To do this, use the keyboard shortcut "Ctrl + Z".
Saving the finished document
To save your work, written on a blank sheet of electronic "paper", into a full-fledged file for further use or processing, there are several options:


Microsoft Word sets the option to automatically save the document by default. You can disable this option along the way: "File" — "Options" — "Preservation". In this menu, you can select both the ability to disable autosave and the time interval after which this function will save the modified file automatically. A very useful feature for people who forget to save their documents manually.

When working with documents that are important to you, do not turn off the automatic save function to avoid data loss. The reason for the crash of the program can be anything: accidental closing of the program, crash of the computer due to weather conditions, and so on.
Working with font
The visual perception of the text is very important for the reader. Sometimes, due to incorrect design, the person reading the text loses all desire to finish reading it, no matter how interesting it would be. For a presentable appearance of the typed stream of letters and symbols, there are tools built into the program.
The more complex the design of the text looks, the less willing it will be for the users of the document to read. It is customary to use the font when choosing the appearance of the text Times New Roman 14th size. For headings, size 16 is used.
If you still decide to use a different font at your discretion, Word offers its users a ready-made list of fonts preinstalled with the operating system. In the event that the amount provided is not enough for you, you can install additional fonts downloaded or purchased on the Internet.
The font has two main parameters, it is the font type and its size. In addition to them, there are also other, additional options for more original text design. To apply any of the options, you first need to select a specific fragment of the document for its processing. To do this, hold the left mouse button on the beginning of the fragment and drag to its end. To select all the document at once, press the key combination "Ctrl+A".

- To change the type, just click on its name on the panel and select a new font from the list. By hovering over the desired option, you can preview what the text will look like before making your final selection. You can scroll through the list using the mouse wheel or by pressing the slider that appeared on the right in the open window.

- To change the font size, click on the numeric value to the right of the font name and in the same way you can adjust the size of letters and symbols.

Additionally, you can change the font size without selecting a numeric parameter, but only by clicking on the two buttons responsible for this. The left button increases the size of the letters by one step, and the right one, respectively, reduces it.


Document content alignment
There are four functions for aligning content in a document with a sheet:
- Align left (keyboard shortcut "Ctrl+L");
- Center alignment (keyboard shortcut "Ctrl+E");
- Right Align (Keyboard Shortcut "Ctrl + R");
- Justify (keyboard shortcut "Ctrl+E").
If everything is clear with the first three functions, then what is the essence of justification in width? Everything is extremely simple. This parameter is required when accepting documents in some organizations, because after its application, the text regularly fills the sheet on both sides. To understand this, let's see how it works with an example:
- Left alignment:

- Justify:

The example shows that in the second version, the text on the right side is placed more neatly, closer to the edge. This is how the format of official material should be when it comes to alignment.
Change the style of the text
Almost any editor has the ability to change the text style, and this feature, of course, did not bypass the legendary Word. There are also keyboard shortcuts for these options to quickly design materials.
The Word editor provides three main functions for changing the style. Access to them is open in the top control panel, in the same window as the font selection.

- Bold (key combination Ctrl+B);

- Italic (shortcut "Ctrl+I");

- Underline (key combination "Ctrl+U").

These parameters can be combined with each other. This is what the text will look like with the three style options mentioned above applied to it:

Inserting an image into a Word document
- To insert an element into a document, you must first open the submenu "Insert" in the top bar of the program.


- In the gallery of the Word program, there is already a certain set of images for inserting them into the document. To view these files, click the button "Picture".


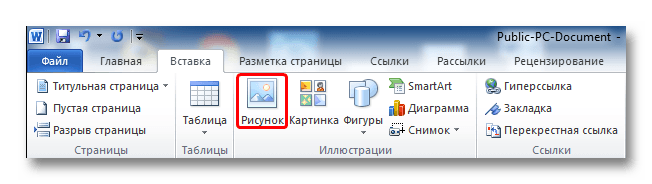
In the window that appears, look for the desired image among the files on your computer.

As you can see, it is not difficult to perform the main work in the Word office program, the main thing is to get used to the interface and adapt to the functions to understand their purpose.
Every modern user cannot imagine a full-fledged work with a PC without the use of text editors, e-mail and other everyday things. Microsoft Office is a unique office software package that combines the most necessary programs in its composition. Using it, you will not need any additional applications for full-fledged communication via e-mail, word processing, etc. An extensive arsenal of tools and functions, as well as the ability to download Microsoft Office for free, have made this product one of the most popular among various users. The developers have created several versions of this software product, which differ in a set of components, so that the complex can be used both at home and in major corporations.
Microsoft Office Components
- Excel is an indispensable tool for working with spreadsheets. With this program you can create and edit spreadsheets, perform complex calculations and structure large amounts of information of various types. The program interacts perfectly with other products included in Office
- Word is a text editor with a wide range of tools and options that allow you to create text documents of all kinds, structures and types.
- PowerPoint is a simple application for creating brilliant multimedia slides and professional-level presentations.
- Publisher is an Office component for printing layout that allows you to develop both the simplest materials and full-fledged booklets and banners.
- Visio is an environment for building diagrams and drawings with a set of tools that can satisfy the needs of both a professional, experienced user and a beginner.
- InfoPath is a tool for working with XML, with which you can automate the system for collecting and processing information by creating your own data entry forms.
- Outlook is an email client that combines functions for working with emails, planning a daily routine, a browser, etc.
- OneNote is your virtual notebook in which you can leave and store any notes, from your own thoughts to your daily work schedule and more.
- Access is a system for creating, maintaining and editing databases.
In order to choose the best edition of Microsoft Office for your needs and download it to your device, read the detailed characteristics of each of them and check that the technical capabilities of your PC meet the system requirements of the selected version.
The tenth office today is one of the most popular versions of the standard set of document management software. Unfortunately, the full professional version of this software product is paid (you can find out the prices and buy it), however, there are collections that you can still install on your computer absolutely free of charge.
Of course, the functionality will be somewhat limited, there will be no full set of fonts, designs, formulas and animations. But the main properties will be preserved in full.
How to install the software package for free
The best option would be to download the trial version on the official website of the developer. Among other programs, you can choose not only the office of this option, but also a huge number of other programs that are available for free. You will need:
What is the difference between the free version and the paid version
As is clear from the description, you will receive an introductory version of the office, which has some work restrictions. But in general, this package is perfect for document management. 
You can use it for one year, after which you will need to either purchase a paid license or repeat this installation procedure for the free version. During use, you will see a record that you are using the evaluation version. But do not worry, all files can be used on standard licensed versions of this program. There are no problems with resaving and further use of files. After the end of the evaluation period, the files will not need to be re-saved and there will be no restrictions on their use.
Legality of this method of using free software
Many people and small companies use this method, wanting to save some money on the purchase of licensed software, which can be quite expensive from intermediaries. It should be separately clarified that this method is absolutely legal. This is due to the fact that you are not using a pirated version, but absolutely legal software that can be downloaded for free from the developer. You have a free developer key, which confirms the legality of using this software. Therefore, do not worry about this aspect.